
Final Project : Cartoonisation Unit 8
Section 1: Review
Throughout the course I have experimenting with a lot of different project ideas and software’s that would be used to create all kinds of project ideas. While experimenting I noticed that I enjoyed modelling characters the most and the project in which character modelling was done seemed to be one my best projects due to me enjoying it the most because of this I decided to create a 3D character model as my final major project. Even though most of my projects have not been modelling characters the skills that I have learned throughout them such as the modelling and texturing can be used so that my character is a successful model
Section 2: Project Concept & Proposed Artist Statement
For my final project I have decided to create an accurate 3D cartoon version of my friend, which I would place into a real life picture of her staring into her own reflection, With the reflection being her cartoon self replica. This will be done mainly in Maya modelling each part of her body while looking at real life images as a reference, the 3D model would also have textures that have been taken from real life images of my friend and online textures that will be edited in photoshop to create more of a cartoon feel to the character rather than make a realistic replica.
My work will engage my audience as it will be a realistic looking image that has been modified to include my 3D cartoon model of my friend in a very realistic looking atmosphere having the emotion fit the setting well such as taking photos of my friend with a shocked and confused expression as she would have had when seeing a cartoon reflection of themselves this will make sure that my character fits well and creates a realistic atmosphere. My final outcome will include a few images of my friend staring at her reflection in the mirror, but the twist is that she will be staring at a cartoon version of herself.
Section 3: Method
Before being able to start the project I'm going to have to take photos of my friend from both the front and side angle in the position that I would want my character to be made in so that it simplifies the process of modelling my character.
Once I've taken all the necessary pictures I will have to model my actual character in Maya where I will model the body shape and posture using basic geometric shapes and altering them to create intricate and accurate shapes to build my character from.
Soon after modelling a rather box like character I will smooth my creation out and alter any changes that it may have made while using the references that I have this will make sure to create a very detailed and accurate character based on my real like friend.
Texturing the model will be one of the most important aspects of this project as this is what brings my character to life, by knowing this I will experiment with toon shading and texturing with real life photoshopped pictures and those you can find on the internet.
When my character is finally complete I will use the pictures I've taken before where I imagined my character would be placed and placing it also into Maya where I will experiment with the angles and reflections to make my final image very realistic this can also later be enhanced by tweaking the finished pictures on photoshop
Section 4: Evaluation
I will critically analyse my work by comparing the cartoon version of my friend to the original photo, which will be taken by myself, this will allow me to visually analyse the differences between them and if the two people look fairly similar. This can be done by looking at certain aspects of the characters such as the body shape facial expressions and aesthetical properties such as the hair or clothing worn during the photo.
I can also analyse my final project by how realistic the final images look and whether everything seem to be in the correct size or is the use of lighting and shadows create an appropriate illusion to the viewer.
My final project evaluation will consist of a detailed paragraph explaining the similarities and differences between the two character, what I did well and what needs to be improved, the information along with pictures will create a detailed and understandable evaluation
Moodboard/Inspiration images


Week 1:

Looking at this image I truly understand what my final image will look like as this scene from tangled expresses it very well due to my idea being very similar but everything apart from the reflection will be reality.


Cartoon style inspiration Disney
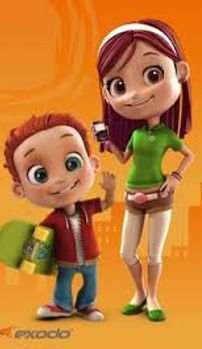
Looking at these images of Disney animated films, I have decided as to what type of cartoons I would like to pursue into my model. This cartoon style has been incorporated in to all of these Disney animated films and all of them have a very similar features such as fairly large eyes in proportion to the face and most of the female characters have a rounded of face with an innocent looking expression no matter of the desired expression of the character in the scene, therefore I would then take this into consideration when modelling my own character. Even most of the textures have very little texture most of it involves just different shades of one specific colour such as shown in the skin colour of all the characters, this would also be incorporated into the texturing of my model so the style of my character is similar to the style of these.


Comic books:


For this part of my research I looked into comic books focusing more onto the female side of it and how female characters are portrayed in comic books but also looking at how they are drawn and what are some of the obvious similarities between them so that I am able to use these features when looking into my work which will allow me to have a higher understanding of different types of cartoons and how they are made to simplify the project for me beforehand.
Some of the features I notice first is that the colours used are solid and vibrant this really creates this comic book theme, which is also done by the thick black outline surrounding the whole character and the detail within it which really emphasizes the bold cartoon look to the scene. Secondly I notice that comic books also have a very precise idea of a female body which is based around exaggerating the female body features such as a very thin waist and wide hips and chest but also having a very slim and toned body in general.
Own Photographs for modelling:


I took my own images of my friend so that I am capable of basing my model of them looking at the proportions of the image and comparing it to my own model to create an accurate projects which shows that I look back to my reference almost all the time so that my model is successful.
Also I’ve taken these images so that I am able to use them when creating my composition where my model is the cartoon reflection of the original image that will be presented in a modelled mirror, this will create an interesting and unique way of presenting my final model. The finished model will be composited and edited in Photoshop to add in shadows, lighting and detail to really create a realistic atmosphere.
Modeling video used; by James Taylor
Week 2:
Modeling:
In this video I learnt all about how to be able to model a realistic character model in Maya 2016 that represents my character and looks almost exactly the same or as realistic as I can make it. The video shows me in great detail how to model each part of the female body while looking at photographs of the front and side profile, which I have already taken prior to this. He talks about making your model of a female body by using all kinds of tools such as extruding and creating bridges between polygons to really create the shape you want, this will also help when I would want to texture my model.
Also this video helped me to understand forces of gravity acting onto the model as this will help me visualise my model before I start to model it which will allow me to fully understand how I am going to create my model from very simple shapes. Another skill that I would need to use is the smooth tool where I would flip back and forth to see what my model would look like when it is smoothed out, as that is my desired final look. After completing my model creating a very blocky model I will smooth it, which will create the final outcome, although I will have to alter the model slightly as it may go out of shape because of it.
Overall I think this video has been very useful to me to really understand how I will create the model step by step and what to take into consideration when making it.
Modeling: First images


When modelling the body by comparing it too the images taken above I modelled half of the body at first including the leg and arms and the main body was modelled separately with the clothes on already which simplified my work. Firstly the legs were made by modelling each part separately such as the thigh calves knees and ankles this allowed me to create the exact angle that has been captured in my own pictures once the main cylinders and spheres were in place I then inserted edge loops to create the shape of each part while still comparing it to my references. This was done to both my arms and legs.
Once that I was complete I then went on to creating the main body starting of with a flattened out cylinder and inserting edge loops and extruding face to create the exact body shape shown in the references, since my model is clothed I inserted more edge loops and adjusting them to create the shape of the shirt. After the basic model was complete I then smoothed out my model altering certain aspects so that my model represented the reference well. When doing this I made sure that each shape contained a limited amount of polygons to keep the program running smooth but still creating a very detailed model of my friend.

Textured model:


Once the main model was complete I started to begin texturing the model by using my own first hand pictures to create textures that fit the model well, this was completed in Maya using lambert textures and UV mapping them into place so that it creates a real looking and even texture with no tilling. When looking at this model I realise that the sock texture does stretch out on the sides. One of the problems I noticed when looking back at these images is that the proportions of the arms compared to the body is wrong as the arms look far longer than they should be which I then corrected on the model. When texturing this model I came across a few more problems such as when textured the arms I realise that rendered the actual model created shadows across the elbows because the limbs were not properly connected.
If I compare my model to the cartoon models from my research I noticed that my model looks far more realistic than cartoon this is because the model is accurately modelled by comparing the reference images taken, when most cartoon models have their own specific body shape which portrays women in an unrealistic way of amplifying main body features such as a small waist with very obvious curves and having a specific head shape in all of their female characters because of this I begin to try altering my idea to fit the cartoon model a lot more.
Week 3:


Unrealistic portrayal of women in media:
Female video game characters such as Lara Croft from "Tomb Raider" have historically had body types that were far from "average. “Most iconic female characters are, in various ways, stylized in an unrealistic way. Due to this I have decided to remodel my character to create a model that looks fairly close to what most companies create, therefore I shall I resize my model and create a far more curved figure with an unrealistic waist far skinnier than it should be.
Due to the way video games portray the female character I will take this into consideration when modelling my character so that my character fits in well with what is expected in video games this will be done by exaggerating the idea of a thin waist, very curved body and a well structured head shape, even though creating a character with un realistic female body features is against the purpose of the report written in the article which goes against how female characters should be portrayed in game, I want to use these features so that my model fits more into the professional aspect of work when modelling female characters that could potentially be use in the game industry.


I started texturing my model slowly using the projection tool to project realistic looking textures onto the model combining them with the burn, dodge and blur tool to create a realistic looking texture. On top of that I used the paintbrush to create the skin tone and blended it with the projection so that the texture look blended out well.
After the texturing was done I moved and re modelled some of the features to fit the texture well and create a unique slightly shocked expression.
What I realised by looking at this head model is that the textures itself are far too shiny and smooth to be used in the model, looking at just the hair texture it does have a 3D look to it but the way the texture is laid out it does not fit the model at the hair strands follow a different route compared to the way the model has been made. The eyes are textured well but for my style theme are too realistic and don’t express my desired shocked emotion well
Overall the model and texturing does look ok but the texturing and the way the model was made does not fit with my desired theme therefore I will alter it by remodelling the hair and eyes focusing more on how I should model my characters head so that it portrays the cartoon feel well. I will try new ways of modelling hair such as modelling it strand my strand to create depth and detail into the model itself.
In these first two images I first made a simple model of her face structure and started adding in simple features such as the nose and mouth which was created in the basic subdivision after this I began to subdivide to create a lot more detail as shown in the images creating a lot more finer detail into the model such as the smile lines.
Soon after I finished the basic facial features such as the eyes and nose I began to model the hair by creating basic shapes outlining the hair style I faced a few problems during this process as the hair seemed to be fairly flat and unrealistic due to the hair looking far smoother than it should be, creating the fringe created more problems as I wanted to have the fringe hang down the side of the face which caused a lot of overlap in the mudbox model.
Throughout the process of this project we have presented our work to the rest of the class explaining what you have done so far, what you’re planning to do and how you’re going to do it. This allows us to improve our presentation skills and receive feedback on our work on what has been done well what you should improve and how you could move your project into the better.
What I have been told is that my model was well modelled the body looks in proportion when compared to the original images, what they noticed is that the arms seem to be slightly too long which I have justified and have changed to make my model look far more accurate than it did before, also the joints such as elbows, knees, ankles and shoulders seem to not be connected well as when rendered you can see where the joints have been combined which makes it look incomplete this can be easily improved by bridging the faces together to creates a smoother feel.
Finally the texturing oh the modelled was appropriate and fitted well to my original images but on the other hand if I wanted my model to look more on the cartoon side I would have to change both the model and textures drastically especially when wanting to create an appropriate facial expression, I was told to look further into how cartoon models look especially focusing on the eyes and other aspects that really influence how a model becomes 'cartoonised' due to this I decided to redo my model and focus more on how to create a cartoon model and not a realistic replica.
Class Crit 1:
Week 4:


Second attempt at a Full body model:
Once I restarted modelling my model I re modelled it in mudbox by using the basic model of a human male body provided and grabbing different aspects of the body to create a simple female model after that I sculpted in the detail slowly creating a realistic female body, what I noticed is that I based it more on what a real female model would look like rather than focusing on creating a cartoon like model due to how my model turned out. Also I think I could improve on how I modelled the hands as they look far too smoothed out rather than looking like they were well modelled and based on actual reference images.
Modelling the clothes took the most amount of time as it required me using the wax, pinch and smooth tool to layer clothes on top of the body creating the illusion on folds and stretches that naturally clothes would create when thinking of how they lay on the female body, this was done by adjusting the strength and size of the brush to really create the finer detailing in the folds and pinching the seams on the clothes to create a neat and sharp finish.


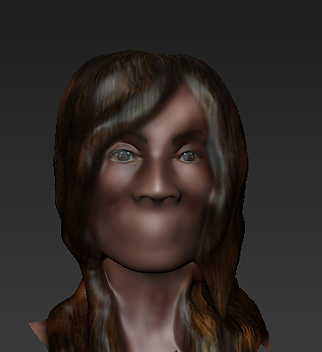
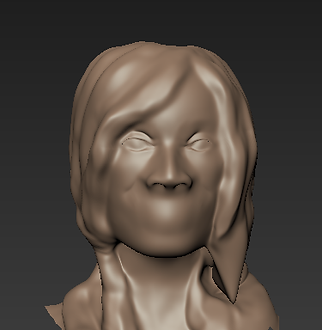
Close-up face model:
This is the head view of my model which I decided not to use due to the fact it was not based of cartoon character references but of actual female models, although I tried to incorporate one of the main aspects of cartoon models which are big rounded eyes it made the model look out of place mainly because the rest of the body did not match the cartoon theme. I also tried creating very simple block of hairs to express the simplicity that cartoon models have which I thought actually worked well with the model.
In the end I did decide to not keep this model as I believed it did not create the desired look that would fit well with the theme that I am trying to pursue when looking at reference images such as the film Tangled by Disney, when comparing my model to the model in the film I realise that the figure is fully out of proportion as the head is rather large and so are the eyes the hair has a good amount of detail creating a basic style, both the arms and legs are thin compared to a realistic body figure and waist is rather well defined. Due to these aspects I shall re make my model to fit into these attributes.
Artist: Roy Lichtenstein

Week 5:
I researched into this artists work as his art is based on a cartoon like style of work, it included bright bold colours without shading just flat out colours outlined with thick bold outlines. This observation allows me to influence what I should look at when texturing my model, which would include bold colours with the experimentation and use of toon outlining which allows me to create outlines around the edges of my model including both thick and slightly thinner lines which create finer detail and shape to the model which allows the artist outline how creases and shadows are visible in the work
I decided to pick this artist over many others due to the simple fact that he really focuses on work in his style of work in the whole cartoon, comic book like form due to fact he only colours his work in bold colour created out of small fine dots spread evenly to create in depth in colour and the bold outlines which really finish off the cartoon like look and I would like to use this in my work
More reference images:


I have taken another set of images that will be used when remodelling my model due to the fact my previously taken images did not express the emotion as well as it could have, I also didn’t like the idea my model at the time was squatting which did not look very appealing in a way that expresses the true shocked and rather happy emotion that would occur when seeing a cartoon reflection of yourself, Which is why I thought it was appropriate to retake the photos so that I have a reference to look at when modelling the posture and position of my model and to really represented accurate representation of my friend. I’ve noticed that she is wearing slightly different clothing but this can be easily altered in Photoshop to replicate my model and the textures from the previously taken photos.
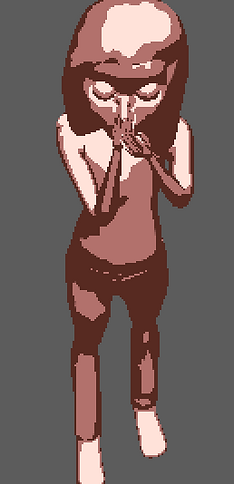
Final model attempt:


I started modelling my cartoon model over again from scratch in Mudbox when I started with a basic human model and edited specific features such as the head shape and facial features, which are necessary to create a cartoon female model that expresses an emotion well. When modelling I faced a few problems when trying to move the arms and legs into shape as I have used the joint tool in Mudbox which created a bend that was rather too smooth and out of proportion, therefore it took me a long amount of time to actually create bends that looked realistic and did not create twists and other unusual deformities to the model, I faced a few which I was able to fix easily by smoothing and relaxing the shape and moving it back into shape.
What I think is rather successful in this model is that it represents clearly a very cartoon feel to it and still show a somewhat accurate representation of my reference. The model has a very thin and delicate figure which seem to be a regular occurrence in Disney films and 3D models, this also applies to the oversized head with a triangle like jaw bone shape. Although Disney films are now incorporating a range of different body shapes in general female models are represented in this specific way, which is why I decided to stick to this idea and base my cartoon model with that in my mind.
Week 6


Modelling of hair:
Modelling the hair was fairly simple it consisted of modelling a cylindrical shape I then used the edge loop tool to create divisions which were then moved by selecting the vertices around it to create a natural looking hair strand shape with both ends of the hair strand being gradually thinned down into a sharper point, Using this strand I duplicated them along the hair and rotated and moved them into shape individually to create a very un natural look to the hair and create texture within it. Some random strands I decided to enlarge and or slightly alter its shape to create very natural looking hair. I then duplicated this process along the head creating a bold spot at the top which I then covered up by altering the strands once again this time making them shorter so that I’m able to layer the hair on top of each other creating a hair like texture and also keeping in mind the hair line and incorporating it into my model.
I think that is a very successful process as it creates depth and texture in the hair and also creating a very unique and slightly rough looking hair which I think fit well with my references, this is because the hair in most of my reference images have significant detail and really express the way hair naturally falls which I think I have done well.
Class crit 2:
For my second class crit I have had the time to remodel and change what I have been told in the previous class crit which was to try and emphasise aspects of the model to create more of a cartoon like model which I have done and tried several times to really perfect the feel I wanted to create and researched into cartoons and how to create the cartoon look which I’ve done by researching pop art artists, looking at the portrayal of women in video games and also looking back and forth comparing my work to my reference images both second and first hand sources.
I have received positive feedback from what I have presented I was told that I have really tried and looked into modelling cartoon characters which seems to be visible in my work and also shows experimentation with modelling different aspects of cartons especially with the main body and head which has been changed many times, which shows that reflection has been shown in my work.
Finally I was told that I should neaten up my website and create a more of a magazine blog likes style in my website which I have done by separating my work into their own sections, I was also told that I should experiment with texturing to show the best possible option which I would use that also focuses on emphasising the cartoon look that I am aiming to create.
Week 7:
Texturing:

Experimenting with toon shading:

I wanted too experiment with toon shading as it seemed to be appropriate when realising that most cartoons feature shading that really depends on how light is used and the angle in which you’re viewing the character in, therefore I decided to experiment with toon shading which allows me to alter the way colour hits my model in various ways such as adding in more colours and the amount of a specific colour you’d like to include this allows me to experiment with the idea of more or less light that hits my model, I was able to alter the sharpness and how colour should be transferred to the other.
I faced a specific problem as I wanted to incorporate toon shading with my own texturing to create a top coat effect that’s slightly faded by layering toon shading on top but I was not able to combine my own textures with toon shading after several trials and experimentation when using toon shading, in the end I decided that I will 3D paint my model but still keep in mind how the angle and light affect the shading therefore I can slightly darken areas to create depth in my model.

Experimenting with toon outlining

After realising that in most of my research everything seems to have a black outline that varied in size outlining the edges and also has been used to create depth, such as the artist Roy Lichtenstein who uses lines to add shadows into his work just like most cartoons do since they consist of a flat colour which is why based on my research I would incorporate black outlines in my model so that it is visible that I have looked into cartoons and show how my work has been influenced based on the research done. Black outlines around the edges of my model will also neaten up any sharp edges that may occur in my modelling and create a nice finish on my model.
Toon outlining creates black lines around the edges of the model which can be altered in many ways such as altering the thickness of the line, the offset or 'line end thinning’ which thins the ends of the outline so that it creates a gradient finish without it being too drastic. Something that I noticed is that no matter how much I change the offset of the black outline it still seems to be far off and is not touching the model also when rendered in mental ray the outline does not want to appear on the render even after multiple tries of trying to work out if there’s a way to have the toon outline appear when rendered using mental ray.
Final renders:


Week 8:
Textured model:

These are the rendered images through mental ray after I have finished texturing my model which I was able to do by 3D painting my model slowly and creating depth by painting similar colours next to another ranging in darkness and blending them out using the blend tool which is how I created the skin texture making sure that some aspects of the face are visibly darker than the other, but my main focus were the eyes as that seems to be the most important aspect of a character when wanting to really express a certain emotion , therefore looking back into my original research of Disney character looking at the eyes I notice that most of them appear to be wearing makeup which is why I have decided to add my own this allows me to define the eyes and have them stand out from the face this was done by firstly blending out lighter and darker shades of blue to create the shadow and then adding in a very thin layer of black closer to the eye which will make the eye pop even more , after fully blending out the colours my character shows a lot more of an expression and also has a focus of the eyes. Using lambert textures and UV mapping them into place, which was specifically needed for the eyes, has textured the eyes themselves and the hair.
These final renders will be used in my final composition, which I will complete in Photoshop.
Week 9:
Compositing and Visualisation:


I decided to finish off my project by compositing my model into a real life environment by placing my model in the mirror reflection of my actual first hand taken photos. First of all I have taken my model and rendered my final image in mental ray which I have then cut out using the magic wand tool and edited by drawing in a very faintly tainted blue glass colour which I used to fill in over the top of my model and adding in a cartoon like reflection on the side.
I also really wanted to emphasise the shocked emotion in my work which is why I decided to draw comic book feel electric shock like sparks coming out of my models head which I feel is appropriate as it allows me to exaggerate the emotion used in the image so that it is clearly visible to the viewer. The second image is my own taken photo which I have also cut out with the magic wand tool and have darkened her jeans so that it look appropriate and accurate when compared to my model.
In this image I have added in a background by taking my own photographs of my living room which I have used to make the image look like its based in a real life environment I’ve made sure that the reflection of the mirror is exactly what would have been shown if the mirror was to be placed where it was allowing the image to look realistic. Since the light source seems to be on the right I made sure to incorporate a shadow of the mirror visible on the floor which has been done by using the burn tool to create a darker shade without having to paint a low opacity layer on top which I think would not look as real as it could be. In the final image I have combined all of the aspects I’ve mentioned above to create my final image, which I believe is fairly successful and shows off my model well.
Final image:

Creating an animation:

Experimenting with blend shape:
To create a very simple animated expression I used blend shape, this allows me to move selected vertices to another location by assigning a key which creates the in between movement creating a short manual animation, this can be done multiple time to different parts of the model.
I used this feature to create a simple shocked expression by raising the eyebrows , I also experimented by trying to create a more of an angry expression by angling the eyebrows inwards to create an evil angry expression.
If I had more time to experiment with animating I would animate different parts of the model to create a range of expressions which I can adjust easily. I would also experiment with rigging and creating joints to move the actual body rather than sticking to just animating her expression.
Original render:
This is the original 300 frame mental ray render which took over 3 hours to render , and then takes into after effects to be able to experiment with the lighting and effects when creating the animation. What I noticed once the frames rendered is that they are very dark therefore tend to lose most of the detailing due to the lack of light and or brighter colors to stand out from the black background.
The render itself is very boring which is why I have chosen to take upon a different approach when creating an animation , I wish to do this by creating a creepy and tension rising atmosphere within the animation to increase interest and the overall appearance of the model, Which I will do by researching into the idea of horror and what makes a horror scene scary and in the end successful, this will allow me to influence my model basing it on the way horror is portrayed through effects and sound.
Researching into horror:
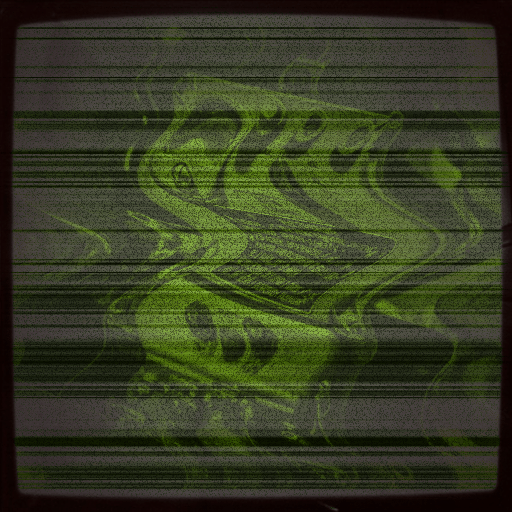
When researching into horror and creepy gifs I found out that a lot of them seem to be based around a glitch of some sort on a TV screen, as shown. What I notice in this gif is that it seems like its supposed to be a regular CCTV camera which looks like its glitching out with screens changing at a rapid pace and showing a shadow figure standing with its arm out stretched towards the screen. This is something I would like to achieve in my animation where it seems to start like a normal video but ends up glitching out creating a rather creepy looking figure for split seconds.
I can also see that the gif is based around a certain colour scheme of greens and black and white which really emphasizes the idea of a rather paranormal atmosphere. I'd like to achieve this in my work by altering the colour to something like black and white to emphasise this idea.
Finally i like how this is based around a TV which is done by having the whole grain effect throughout the whole video and the black curved outline to show the shadows along the rim of the TV screen , which I think is really successful in creating the mood and atmosphere of the gif.
Looking into horror: Effects

This gif also uses the idea of a basic colour scheme this one being only black and white and also continues with the whole glitch effect the only different aspect of this is that the glitch causes the main character to glitch into different areas of the screen for split seconds and then goes back to the original I will include this by making the camera shake throughout my animation to create this gritty kind of feel to it. The fact that the girl has her hair covering her face creates a sense of mystery and suspense which fit in well with the whole creepy type of horror, also both the girls walk and outfit create a paranormal and unusual feel and create a sense of fear towards the viewer
Looking into horror: Sound
Another aspect that makes horror scary is the actual sounds that create tension for the viewer without it the horror movie would be boring and plain, therefore sound is one of the most important part of creating a successful horror scene. When looking at this video the first thing we notice is that sound is used well to express the mood of the scene which is shown at the very start where the music suddenly changes to a rather scary loud sound when the murderer is shown this creates a feeling of fear for the viewer it is also appropriately timed for the video which is some of the things i need to take into consideration when creating my own animation , such as appropriate sounds for the scene at the specific time, a slight build up of tension and timing the sounds perfectly to really express the mood that I wish to express.
Final animation:

Evaluation:
Looking back at my project I notice that there are both good and bad aspects to it, first of all I think I have successfully completed a well done project which is closely similar to what I stated in my statement of intent which consists of me wanting to model a 3D replica of my friend in a cartoon style while compositing it into her own reflection to create a real life atmosphere surrounding my cartoon model. What I think is most successful about my project is the final composition as I feel that it really brings the project together and expresses my original idea well, the final composition is well proportioned and I have taken into consideration aspects such as light, shadows and scale which are important factors when wanting to composite a realistic looking image. Lastly I decided to create a short animation which shows off my model and my ability to create movement and trying to rig my character which I will be looking into later in the process of modelling
For my composition: there are some aspects that I would want to improve if I was able to continue or improve this project and that is the actual model as I noticed that the legs seem to be slightly off and have a too sharp of a cut toward the knee they also seem to be positioned slightly off when compared to my own reference images therefore net time I would alter the legs by widening out the knee and adjust the position in which the legs are placed it so that it matches my reference images to a higher accuracy. Another thing that I would improve is too look into the UV editor so I can manually adjust the UV so that they are organised in a more timely fashion, but since I used the automatic UV editor my UV maps are slightly off therefore there seems to be a faint like on the side of the jeans as to where the UV maps seemed to have overlapped and failed therefore creating a line across the leg which is not me textured.
During this project I have learnt and practised new techniques that have helped me complete my project this include both toon shading and outlining which allow me to emphasise the cartoon feel my model should have, not only have I learn how to create cartoon models but I have learnt how to use the nHair tool which allows me to create hair by creating follicles and editing the hair stand length, thickness and the amount of hair or colour which I have not decided to use in this project but the skill will be useful when wanting to create characters with a more realistic hair structure rather than creating a more blocky one which looks far more appropriate to a cartoon model. I’ve also improved actual modelling and texturing skills by experimenting a lot with both Maya and Mudbox and combining both to create my final model. I have learnt all kinds of techniques but I do feel I still need to improve a lot more especially getting to know both Maya and Mudbox well so that I am very comfortable using these software’s as they are one of the most popular software’s used in the industry.
In the making of my project I have researched into a lot of sources such as films, articles, traditional art and actual professional 3D models used in the industry which have influenced me greatly during the making of my project and I believe is shown clearly, one of the sources that has influenced my the most is Disney as they are a well knows company which are known for creating 3D cartoon characters featured in their movies therefore comparing my work to theirs have allowed me to be ambitious towards how my model should like in comparison which have got me to this stage where I see similarities when comparing my model to theirs, my own model is not as well developed and may not be to the standard that they have but with more work into the texturing and aspects of the modelling it can be improved to be very similar to their standard.
When making my model I encountered many problems that have caused me to rethink and remodel my actual model this was first done once I have modelled my first character in Maya but I have noticed that when rendered the actual character had joints that were far too visible due to the fact they were not properly combined which I could have fixed by simply bridging the edges together but since my model had so many faces it seemed close to impossible even after reducing the amount of polygons which is why I decided to redo my model after researching into the topic more and focusing on my reference images to really create a model which fit my desired theme, I have then redone my model which I decided not to use due to the fact they still did not fit well into my cartoon theme as my second model looked more like a realistic model rather than focusing on creating a model that has a close relation to what cartoon models look like and exaggerating certain features such as the eyes.
I’ve also faced problems when experimenting with toon shading and toon outlining which I have mentioned before but in the end I decided not to use those aspects but use them as inspiration as to how I should texture my model to greatly express my theme.
Another aspect of the model that I found difficult is the hair, at first I decided to make more of a block like shape but I thought that it looks far too plain ad showed no depth and texture therefore I experimented with nHair which allowed me to make very detailed hair but I did face many difficulties due to the hair crashing my Maya and overall it did not fit well with my theme as the hair looked far more realistic rather than expressing my cartoon style theme. Therefore after looking back and forth at my research I noticed that the hair has been modelled by creating smaller blocks of hair that create the desired shape of my model which is why I decided to model strands of hair to alter them to fit the desired look that I was looking for.
Overall I think my model has been successful and has been based closely off my first and second hand research and statement of intent to model an accurate representation of my friend. Critically analysing my work I have came upon this decision as I am comparing my model to the original photos and I seem to have successfully created an accurate representation due to that fact my model seems to be fairly accurate, also when looking at my final composition I have created a realistic image that closely represents what I wanted to model this is the reason as to why I think my model is successful.
For my final animation: The main aspect of my work that I would like to improve is the actual original rendered animation. For my next project I will focus more and experiment with a lot of more techniques that will allow me to animate the character in maya so once rendered it creates a unique and fun animation that fits well with the desired theme that I tried to achieve such as this time I tried to incorporate horror into the animation to interest the viewer rather than have them watch a boring simple zoom out of my character model with just a simple face animation.
I would also like to create a far more exagerated tension build up when adding in sounds and effects to my animation this can be done by adding more sounds that build up volume wise or having a wider range of sounds that accompany the desired feel of the video.
Throughout the making of this animation in after effects I have learnt many skills and got myself familiar with the software as I started out not knowing anything about it but after a while of learning and experimenting with software both from videos and first hand trial and error process I managed to learn a good amount to be able to create a horror based animation by trying out different effects such as black and white filters , experimenting with the saturation brightness and contrast levels and also looking into the rather unique features that after effects offers such as 'dust and scratches' which allowed me to create a scary looking face that was based off the original image that was created by altering and playing around with the settings. Not only did I learn how to add effects into the animation, changing the opacity and what not I learnt how to appropriately render the final animation into YouTube so that it came out in the highest quality possible which took many trials but finally came out to be successful.
I believe my horror based animation is successful because of the research prior to the making which allowed me to really focus on what I wanted to achieve with the final outcome pictured in my head before the finished project which helped me a lot as I had a standard to achieve. The research done allowed me to see what was successful and what wasn't. The fact that I had this prior research allowed me to compare my work back and forth so that my final outcome is closely related to my research.
Overall I think my final animation became a success as I managed to express my desired theme well basing if off the research, both the sound and the flashing images and change of effects matched each other which made the animation seem neat and well made.