
Unit 12 Mecha
Working with simple rigs:
Before starting my mech I experimented with rigging basic leg movements by looking at the bone structure of a human and how to model a realistically walking leg when using joints and IQ chains, overall I think my interpretation of a rigged leg is fairly accurate and i was able to create a short animation of the model walking up stairs .
Research:


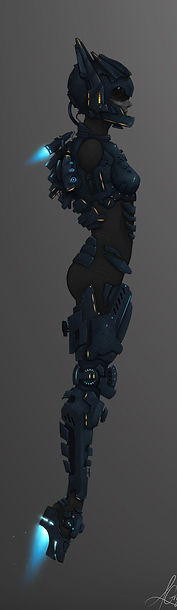


First of all I started looking into female robots which accentuate the female figure for my inspiration, what I noticed is that the armor plating is closely modeled to the female figure which is an aspect that I would like to include in my models, Asome sort of mechanical weapon is used in most of the models and when its not it seems like the model is attached to a machine with some sort of cables, both of these seem to be an appropriate choice when modelling my model.
3D model:


Before i started to create the armor for my female robot i first of all created a simple female body figure in Mudbox to keep the model proportional and to be able to have a basic starting point for my model which i would later delete simple because it contained too many polygons. After I transferred the model into Maya I began to create armor by firstly modelling a box and then adjusting each vertices and adding divisions to create intricate shapes that closely relate to the female figure. What I did notice about the model is that its starting to look very square and didn't show off my potential when working in Maya so i shortly decided to redo my model and think about different kinds of aspects of 'mech' that i could base my model on.
Research:

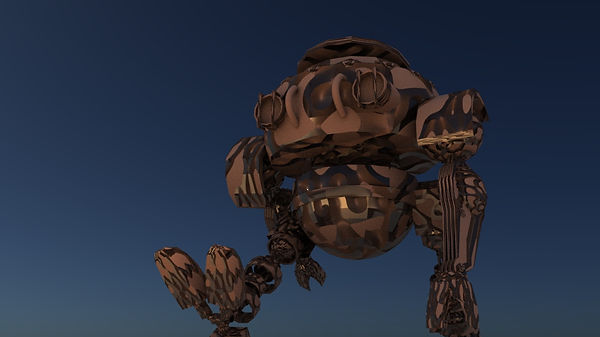
After looking up interesting models that would be somewhat fun to rig I managed to find a drawing of a mech that I would want to take as inspiration by copying different aspects of the model and incorporating it to create my version of this mech. What I really liked about the model and wanted to keep was the simplicity but still have a very effective way of portray a slightly detailed model but mainly focusing on the rigging aspect
3D Model without bump mapping:

To create this model I had to use a couple different skills to successfully complete a rigged model. First off all i began by creating basic shapes and adjusting the amount of divisions it contained and by selecting all the vertices i was able to resize the model without creating problems when wanting to rig my model. By selecting edges, vertices or faces i created the basic model keeping into consideration joins and the genuine bone structure that will simplify the process.
For some areas of the model I created curves and extruded a basic wire like shape that created smoother curves and bends. A problem that I faced is that I had experiment different ways of modeling as the original inspiration model wasn't accurately made and would cause problems when trying to rig the movements. Overall I think the model was successful as it clearly shows what the model is trying to portray and is capable to be rigged
Bump Mapped:


I wanted to create a rusty rather texture to create depth and a realistic feel to it of a rusty old robot, I really like how it turned out overall but There is a problem when wanting to render the model as the bump map itself does not want to render when done on a lambert texture therefore I had to find a way of rendering the bump map, successfully i managed to find a different texture that allowed me to edit the bump map in a live render which is a new feature added into Maya 2017 that allowed me to create unique textures that are shown below in the renders
Render experimentation:
Render experimentation:

I managed to render out a bump map as shown here
I played around with the settings such as the
threshold, amplitude and ratio that allowed me create unique high quality textures in a live render
I managed to render out a bump map as shown here
I played around with the settings such as the
threshold, amplitude and ratio that allowed me create unique high quality textures in a live render
In this specific render i created a texture that looks something towards a reflective see through glass texture that has a brown tint to it. I really like this specific texture but i feel that it does not show a rusty and old look to the model but the exact opposite as a modern replica which is why i changed the setting to a more scattered effect
In this specific render i created a texture that looks something towards a reflective see through glass texture that has a brown tint to it. I really like this specific texture but i feel that it does not show a rusty and old look to the model but the exact opposite as a modern replica which is why i changed the setting to a more scattered effect

The finished rendered texture is very appropriate to the initial idea of a old and rusty mech that creates depth in the model I really like how the texture is random and does not follow a specific design to create a patchy look. Although it does create a rusty look the actually texture is not as 3D as I would want it to be therefore next time i will look more into bump mapping with the Arnold renderer.
The finished rendered texture is very appropriate to the initial idea of a old and rusty mech that creates depth in the model I really like how the texture is random and does not follow a specific design to create a patchy look. Although it does create a rusty look the actually texture is not as 3D as I would want it to be therefore next time i will look more into bump mapping with the Arnold renderer.
Final rig
Final rig
Evaluation:
Overall I think I successfully managed to rig a model even though it is not yet at an intermediate level. The model itself is fairly simple but still manages to look like a decent mecha.
Although I really like the way my model has turned out I feel like the rig could have a lot more to it as right now it seems to be fairly basic due to the fact it only has working arms and legs and a few adjustable features such as the body and top flap, therefore if I were to have more time I could incorporate different aspects such as modelling a gun or a weapon that i could closely rig part by part to create more of an animation, such as moving a curve in one directions allows the gun to open up and shoot rather than rigging part by part to manually animate.
The rig was created by combining joints and IQ chains binded to the model which allowed it to move smoothly then parenting that to a curve so that it could be easily controlled, this would only be successful if you modeled the mech in a way that takes into consideration its joints and how it would move.